


In this post, I would like to share an overview of Git and how you can take your first baby steps in Git and the Version Control Journey.
Git is a popular and freely available-to-use (Open source) Version Control System(VCS). This is the most frequently used version control system today in the world.
You are probably wondering what Version Control means. Well, it is the practice of tracking records and managing changes made to a file.
Git is used to;
- Track code changes.
- Collaborate in product/ Software development.
- Track which collaborator made changes to a code/file.
Git can be downloaded from the official website https://git-scm.com/downloads.
Wow, I just realized I never mentioned GitHub earlier.
GitHub is a cloud-server platform used to host codes and allows you to collaborate with team members on a project from anywhere.
To download GitHub visit http://desktop.github.com
Basic Git Commands
After the installation process, run git --version or git -v(shorthand) through your Terminal/ CLI to check the version of the Git software installed on your personal computer.
So, to help you get on your feet, I have listed out a few key commands and their functions sequentially. Follow these step by step, and expect good results.
Config
The git config command is a convenience function that is used to set Git configuration values on a global or local project level.
Run git config --global user.email "your_email@example.com" to set your GitHub email address.
Run git config --global user.name "your_username" to set your GitHub username.
Run git config --global --list to list your Git information out.
Getting started!
Run cd [project-folder name] This is used to change directory into the specified folder name.
Run git init through your Terminal/ CLI in a specified directory for a project. This is used to initialize a git repo in a directory/ folder on your local machine (personal computer).
Run git status to view a list of untracked, modified, and/or staged code files.
Staging and Committing the Changes
Unlike the other systems, Git has something called the “staging area”. This is an intermediate area where commits can be formatted and reviewed before completing the commit.
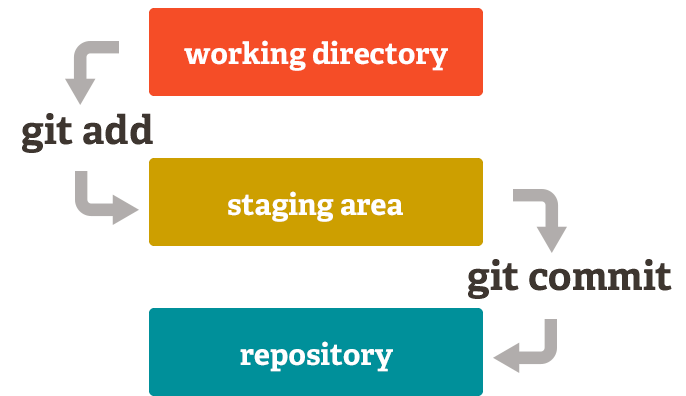
One thing that sets Git apart from other tools is that it’s possible to quickly stage some of your files and commit them without committing all of the other modified files in your working directory or having to list them on the command line during the commit.
Run git add [file_name] or git add . is used to add the code file to the staging area to begin tracking all changes made or stage a code file.
Run git commit -m"[commit message]" this is used to commit a code file with a short descriptive message from the staging area.
e.g git commit -m "This is my initial commit for this project".
Run git commit -a -m "[commit message]" to add and commit a modified code file.
Log
Run git log to print out all the commits which have been done up until now.
The log shows the author of each commit, the date of the commit, and the commit message.
Branches
The Git feature really makes it stand apart from nearly every other Source Control Management out there.
What is a branch?
Git branches are effectively a pointer to a snapshot of your changes. When you want to add a new feature or fix a bug — no matter how big or how small — you create a new branch to encapsulate your changes. We always create branches for features in our projects.

By default, Git commits go into the master branch.
Run git branch to list out all the branches in the local machine.
Create a New Branch
Create a new branch called sample using the following command:
git branch sample
This command creates the sample branch.
We are still in the context of the master branch. In order to switch to the sample branch. run the following command:
git checkout sample
Let’s do some Commits in the New Branch
Modify Hello-World.txt by adding the following snippet:
Hello World
Adding some Content
Adding some Content from sample Branch. Seems Nice!!
Now stage and commit using the following commands:
git commit -a -m "Sample Branch Commit"
This commit was done in the sample branch, and now the sample branch is ahead of master by 1 commit. The sample branch also includes the 2 commits from the master branch.
You can verify the commit history in Sample Branch using:
git log
Merging
The git merge command lets you take the independent lines of development created by git branch and integrate them into a single branch. Currently, the sample branch is ahead of the master by 1 commit. Let’s say, we want all the code in sample to be brought back to the master branch. This is where git merge is very useful. It will combine multiple sequences of commits into one unified history.
First, go back to the master branch:
git checkout master
Then run the merge command:
git merge sample
After running these 2 commands, the merge should be successful. In this example, there are no conflicts.
However, in real projects, there can be conflicts when a merge is being done. This means the same line of code was changed in each branch, and Git does not know which one to keep as the true change. Resolving the conflict is a practice that comes with experience, so as you work more with Git you will be able to get the hang of resolving conflicts.
Run git log now and you will notice that the master also has 3 commits.
The Remote Git Repository
Until now, we have been working only in the local repository. Each developer will work in their local repository but eventually, they will push the code into a remote repository. Once the code is in the remote repository, other developers can see and modify that code.
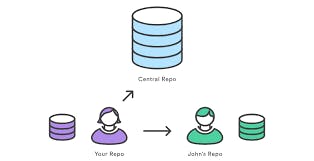
Here we will be using GitHub it is like your Google Docs, except you can create & save your version of the code offline, before ‘pushing’ it to be saved online. Alternatives such as BitBucket are available.

Setting up a Remote Repository.
Go to https://github.com and create an account.
After registering on the GitHub homepage, click on Start a Project to create a new Git repository. Give the repository a name and click “Create Repository”
Give the name git-sample-repo, This will create a remote repository in GitHub.
Enter this command on the terminal and navigate to directory where the local project is stored.
git remote add
The git remote add command takes two arguments:
- A remote name, for example, origin
- A remote URL, for example, github.com/username/git-sample-repo.git
# Set a new remote
git remote add origin https://github.com/Jatin-8898/git-sample-repo.git
# Verify new remote
git remote -v
origin  https://github.com/Jatin-8898/git-sample-repo.git(fetch)
origin  https://github.com/Jatin-8898/git-sample-repo.git(push)
Fetch
The git fetch command downloads commits, files, and refs from a remote repository into your local repo. Fetching is what you do when you want to see what everybody else has been working on. git pull and git fetch commands are available to accomplish the task. You can consider git fetch the 'safe' version of the two commands. It will download the remote content but not update your local repo's working state, leaving your current work intact
Syntax: git fetch <remote> <branch>
Example: git fetch origin sample
Pull
The git pull command is used to fetch and download content from a remote repository and immediately update the local repository to match that content. Merging remote upstream changes into your local repository is a common task in Git-based collaboration workflows. The git pull command is actually a combination of two other commands, git fetch followed by git merge.
Syntax : git pull <remote> <branch>
Example: git pull origin master
Push
The git push command is used to upload local repository content to a remote repository. Pushing is how you transfer commits from your local repository to a remote repo.
Syntax : git push <remote> <branch>
Example: git push origin master
*NOTE : If you created a Readme.md file while creating a New Repository then make sure you first pull then push.
Clone
git clone is a Git command line utility used to target an existing repository and create a duplicate, or copy of the target repository on your system.
git clone <url>
Reset
To reset the staging area to match the most recent commit, but leave the working directory unchanged.
git reset
The following command will reset the staging area and working directory to match the most recent commit and overwrites all changes in the working directory:
git reset --hard
Revert
The git revert command can be considered an 'undo' type command
git revert
Reverting should be used when you want to apply the inverse of a commit from your project history. This can be useful, for example, if you’re tracking down a bug and find that it was introduced by a single commit. Instead of manually going in, fixing it, and committing a new snapshot, you can use git revert to automatically do all of this for you.
This is a forward-moving undo operation that offers a safe method of undoing changes. Instead of deleting or orphaning commits in the commit history, a revert will create a new commit that inverses the changes specified.